A wobbly, vibrating grinding wheel is not just annoying; it is a serious safety hazard. The instability can ruin your workpiece and the fear of a wheel failure is dangerous.
To tighten a bench grinder wheel, you must place the wheel and flanges correctly on the shaft. Then, thread the nut on by hand and tighten it until it is firmly snug using a wrench. Do not over-tighten, as this can crack the wheel.

At our factory in Henan, we don’t just produce wheels; we are obsessed with how they perform safely. A perfect wheel is useless if it is not installed correctly. The process of tightening a wheel onto a bench grinder is simple, but every step is important. It is about creating a secure system where the wheel, flanges, and shaft work together. Getting this right ensures your grinder runs smoothly and, most importantly, safely for every job. I want to show you the right way to do it.
How do you tighten the wheels on a bench grinder?
You have a new wheel, but you are not sure how tight is "tight enough." A loose wheel is dangerous, but cranking down too hard could actually break it.
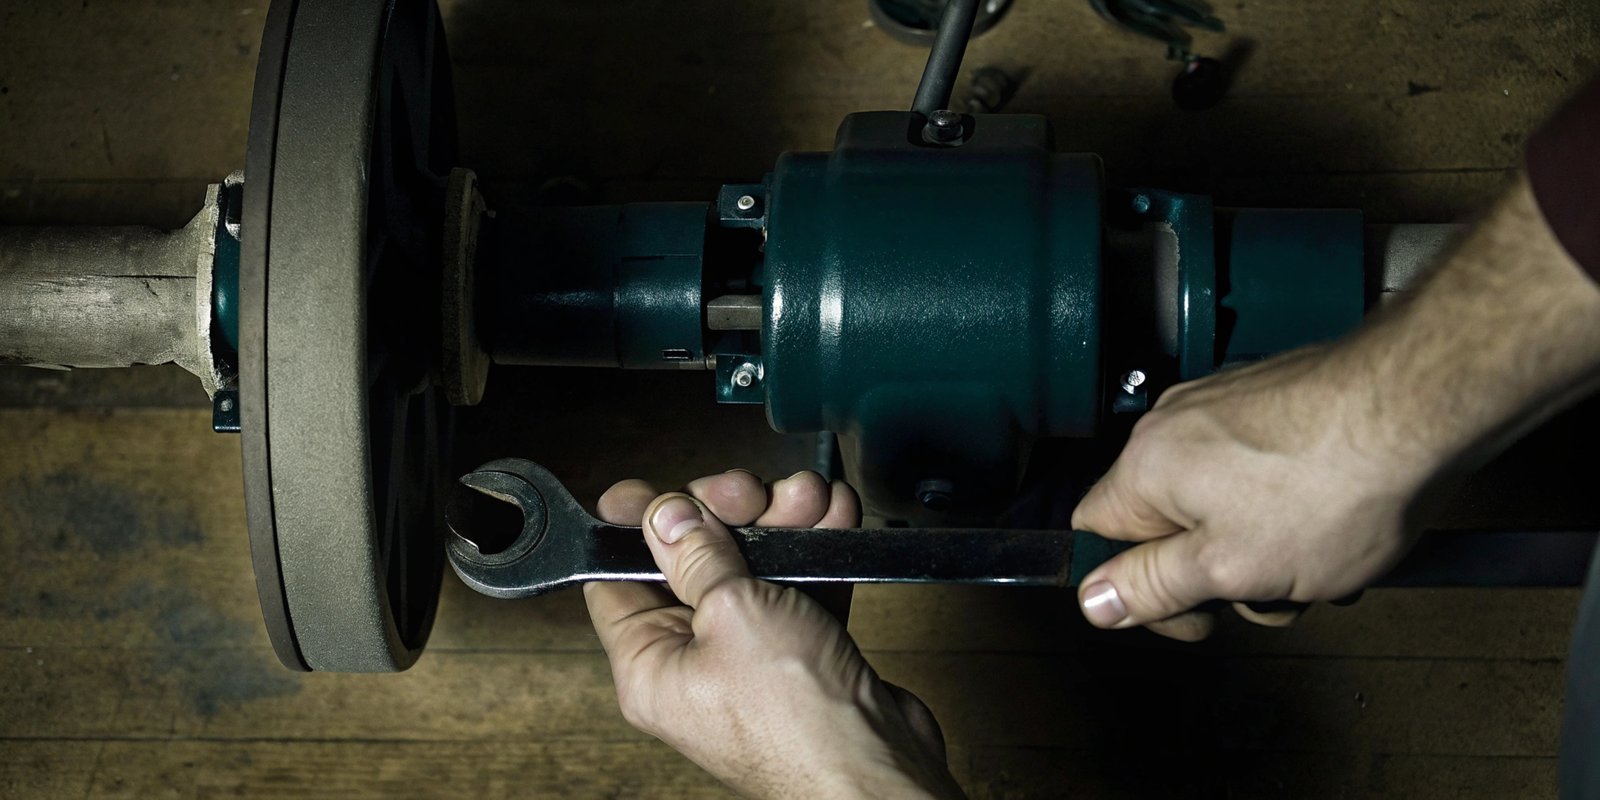
First, place the wheel and outer flange onto the grinder’s shaft. Hand-tighten the nut. Then, brace the wheel and use a wrench to make it snug. Remember the right-side nut tightens counter-clockwise because it has a reverse thread.

Following the correct sequence is key to a secure fit. Think of it as building a small, strong sandwich on the grinder’s shaft. Each layer has a specific job.
Step 1: Check the Fit
Before you begin, make sure the new wheel slides onto the shaft easily but without a lot of slop. A wheel with the wrong arbor hole size will never be safe. Also, inspect the paper blotters on the sides of the wheel. They should be intact. Never use a wheel if these are missing.
Step 2: Install the Components
The order is critical. The inner flange is already on the shaft. Slide the grinding wheel on, making sure it sits flat against that inner flange. Then, place the outer flange on, followed by the nut.
Step 3: The Final Tightening
Hand-tighten the nut as far as you can. Then, brace the wheel with a piece of wood and use the correct wrench to turn the nut until it is firmly snug.
| Wheel Side (Facing Grinder) | Thread Type | How to Tighten |
|---|---|---|
| Left Side | Standard (Right-Hand) | Clockwise |
| Right Side | Reverse (Left-Hand) | Counter-Clockwise |
The goal is secure, not extreme. Over-tightening a vitrified wheel can create stress and cause it to crack. Firmly snug is all you need.
How to remove a grinding wheel from a bench grinder?
Before you can install a new wheel, you have to get the old, stubborn one off. Forcing it the wrong way can damage the grinder and the nut.
First, always unplug the grinder. Then remove the side guard. Brace the wheel to stop it from turning and use a wrench. Loosen the left side nut counter-clockwise. Loosen the right side nut clockwise, as it has a reverse thread.

This is the very first step in fitting a new wheel, and it is where most people get stuck. That reverse thread1 on the right side is a safety feature, designed to keep the nut from spinning off during use. But it can be confusing during removal.
The process is the direct opposite of tightening. After unplugging the machine and removing the guards, you need to turn the nuts in the correct "loosen" direction.
| Wheel Side (Facing Grinder) | Thread Type | How to Loosen |
|---|---|---|
| Left Side | Standard (Right-Hand) | Counter-Clockwise |
| Right Side | Reverse (Left-Hand) | Clockwise |
If the nut is stuck, a little penetrating oil2 can help. If the wheel itself is stuck on the shaft after you remove the nut, gently tap the back of it with a rubber mallet, alternating from side to side to walk it off. Before you install the new wheel, take a moment to clean any rust or grime off the shaft and the flanges with a wire brush. This ensures everything will fit together smoothly.
How to tighten a wheel nut?
You are holding the wrench, but how much force should you use? There is a real fear of cracking a brand new wheel by putting too much pressure on it.
The goal is "snug," not maximum force. After hand-tightening, use your wrench to turn the nut until it stops. Then, give it one final, firm nudge. Think of it like tightening a garden hose connection, not a car’s lug nut.

As a manufacturer of vitrified wheels3, I can tell you that they are incredibly hard but also brittle, much like a ceramic plate. Over-tightening is a common mistake that can be very dangerous. When you crank down on the nut with too much force, the steel flanges can put immense pressure on a small area of the wheel. This creates stress points and can cause microscopic cracks. You will not be able to see these cracks, but they can cause the wheel to shatter unexpectedly once it gets up to its full operating speed of thousands of RPM. The paper blotters on each side of a new wheel are there for a reason. They act as cushions, helping to distribute the clamping force more evenly. Always tighten the nut just enough to hold the wheel securely with no wobble. Once it is snug, it is tight.
Why is my grinder wheel loose?
You switch on your grinder and it immediately starts to wobble or vibrate. A loose wheel is a clear sign that something is seriously wrong and unsafe.
A loose wheel is usually caused by an improperly tightened nut. It can also happen if the wheel’s arbor hole is too big for the shaft, or if the inner and outer flanges are missing, damaged, or installed incorrectly.

A loose, vibrating wheel is a problem you must fix immediately. Do not try to use the grinder until you find the cause. Let’s look at the most common reasons.
1. The Nut
This is the most obvious reason. The nut was simply not tightened enough, or it was tightened in the wrong direction on the reverse-threaded side. Double-check that it is snug.
2. The Arbor Hole
The hole in the center of the wheel must match the diameter of the grinder’s shaft. If the hole is even slightly too large, the wheel can never be perfectly centered. It will be out of balance and will vibrate violently, no matter how tight you make the nut. This is an unsafe condition, and you need a wheel with the correct arbor size.
3. The Flanges
The flanges are the two large, disc-shaped washers that clamp the wheel. They are absolutely critical. A common mistake is to forget the inner flange or to use flanges that are too small or damaged. The flanges must be at least one-third the diameter of the wheel to provide adequate clamping support. Without both flanges in good condition, the wheel will be loose and unstable.
Conclusion
To install a wheel safely, unplug the grinder, use both flanges, and tighten the nut until it is snug. Always remember the right-side wheel has a reverse thread.
-
Understanding reverse threads is essential; this link clarifies their purpose and importance in grinding wheel safety. ↩
-
Learn how penetrating oil can assist in loosening stuck nuts on grinding wheels for easier maintenance. ↩
-
Learn about vitrified wheels, their properties, and their applications in grinding for better performance. ↩
Written by

leeon
You may also be interested in:

What is a finish grinding machine?
Your machined parts have the right dimensions, but their rough surface finish leads to noise, friction, and early failure. This damages your products’ reputation and

Can I use a bigger disc on an angle grinder?
You need more cutting depth, and the bigger disc on the shelf looks like a fast solution. But forcing a disc that doesn’t belong creates