How Do You Remove a Wheel From a Bench Grinder?
That old grinding wheel is worn out and useless. But the retaining nut is completely stuck, and the wheel will not budge, leaving your project stalled and you frustrated.
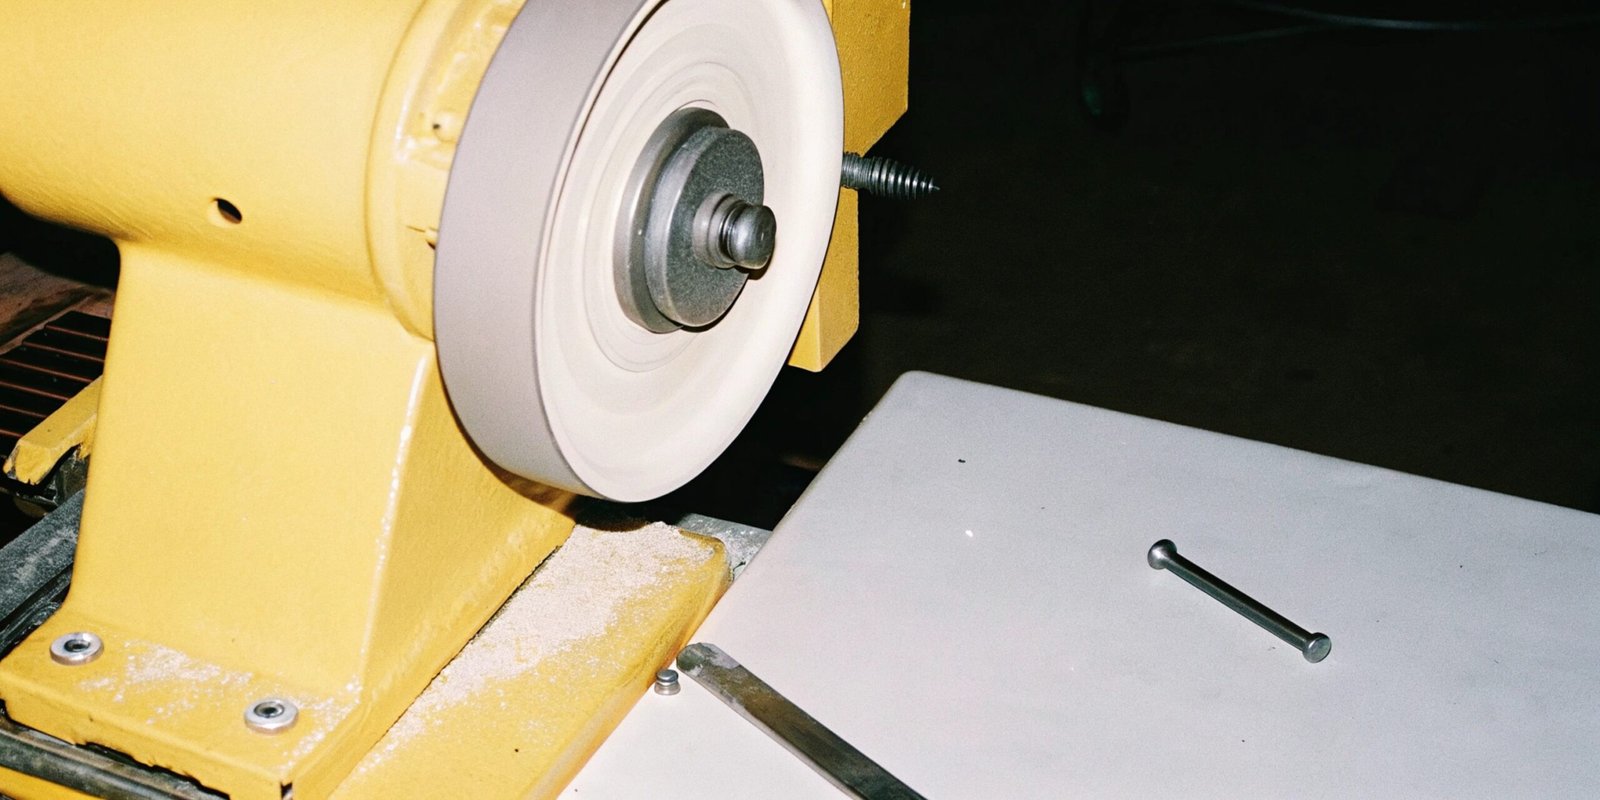
To remove a bench grinder wheel, first unplug the machine. Then, remove the safety guard, wedge the old wheel to stop it from turning, and use a wrench to loosen the nut. Remember, the nut on the right-side wheel has a reverse thread.

Changing a grinding wheel1 is a basic maintenance task that every workshop needs to do. In my nearly three decades of manufacturing abrasive wheels, I have learned that doing this job safely is just as important as the grinding itself. An improperly removed or installed wheel can be extremely dangerous. The most important things to remember are to always disconnect the power first and to pay close attention to the direction you turn the wrench2. The threads on each side of the grinder are different for a very important safety reason. Let’s walk through the process step-by-step so you can do it correctly and safely.
How to get a bench grinder wheel off?
Your wheel is worn down, but you are not sure of the exact steps. Trying to force it can damage the grinder, or worse, lead to an injury.
Unplug the grinder first. You then remove the outer guard, secure the wheel with a wood wedge, and turn the nut with a wrench. The left-side nut loosens counter-clockwise, while the right-side nut loosens clockwise (reverse thread).

Over the years, I have seen many people struggle with this, usually because of that tricky reverse thread3. Let me break down the process into simple, safe steps.
Step-by-Step Wheel Removal
- Safety First: Unplug the Grinder. This is not optional. Never work on a grinder that is plugged in. Accidental startup is a serious hazard.
- Remove the Outer Guard. Most bench grinders have an outer cover over the wheel, held on by a few screws. Remove these to get access to the wheel and the retaining nut.
- Brace the Wheel. You need to stop the wheel from spinning when you turn the nut. The best way is to wedge a piece of scrap wood between the wheel and the tool rest or the workbench. Do not try to just hold it with your hand.
- Loosen the Nut. This is the crucial step. The direction you turn the wrench depends on which side of the grinder you are on (when facing it).
| Wheel Side (Facing Grinder) | Thread Type | How to Loosen | Mnemonic |
|---|---|---|---|
| Left Side | Standard (Right-Hand) | Counter-Clockwise | Lefty-Loosey |
| Right Side | Reverse (Left-Hand) | Clockwise | Righty-Loosey |
This reverse thread on the right side is a safety feature. It prevents the motor’s rotational force from loosening the nut and throwing the wheel during operation.
- Remove the Flange and Wheel. Once the nut is off, slide off the washer-like outer flange. The grinding wheel should then slide straight off the shaft.
How to get a grinder wheel off without a tool?
You have lost the special wrench that came with your grinder. Now the wheel is stuck, and you are tempted to grab whatever tool is nearby to force it off.
It is strongly discouraged. Using improper tools like channel locks or a hammer and chisel can permanently damage the nut, the shaft, and the grinder’s bearings. The safest and best method is to buy a correctly sized wrench.

As a manufacturer, safety is my biggest concern. Every year, we hear stories of injuries from improvised methods. While it might be possible in an emergency, trying to remove the nut without the right tool is a bad idea. You risk rounding the corners of the nut, making it even harder to remove later. Even worse, if you use a hammer and chisel, the shock can damage the motor’s internal bearings, leading to costly repairs. A replacement wrench is cheap. An emergency room visit or a new grinder is not. If you are in an absolute bind, using a pair of high-quality locking pliers4 (Vise-Grips) clamped extremely tight on the nut might work as a last resort. But I must advise you to stop, take a trip to the hardware store, and buy the proper wrench. It is the professional and safe way to do the job.
Which way does the lock nut go on an angle grinder?
You are switching from a cutting disc to a grinding disc on your angle grinder. You press the lock button, but the nut does not seem to loosen, no matter which way you turn it.
An angle grinder nut almost always has a standard thread. After engaging the spindle lock button, you turn the spanner wrench counter-clockwise ("lefty-loosey") to loosen it. The motor’s rotation naturally keeps this standard thread tight during use.

It is easy to get confused between bench grinders and angle grinder5s, but their locking systems are different. A bench grinder uses reverse threading for safety. An angle grinder uses a different method.
Angle Grinder vs. Bench Grinder Threads
An angle grinder has a single spindle, so it does not need a reverse thread. Instead, it has a spindle lock button. When you press this button, a pin engages with the gearbox and physically stops the shaft from spinning. This allows you to apply torque to the nut without the wheel turning.
The process is simple:
- Unplug the tool. Just like with a bench grinder, always start by disconnecting the power.
- Press the Spindle Lock. Press and hold the lock button. You may need to rotate the wheel slightly by hand until you feel the lock engage with a "click."
- Use the Spanner Wrench. Fit the two pins of your spanner wrench into the holes on the outer flange nut.
- Turn Counter-Clockwise. With the spindle locked, turn the wrench counter-clockwise to loosen the nut. It should break free. To tighten a new wheel, you simply reverse the process, turning it clockwise ("righty-tighty"). Always make it snug, but there is no need to over-tighten with extreme force.
How to remove a grinder attachment?
You have successfully removed the nut from your bench grinder, but the wheel itself is stuck solid on the shaft. It will not wiggle or pull off, no matter how hard you try.
If a wheel is stuck after the nut is removed, it is likely due to rust or being pressed on too tightly. Gently tap the back of the wheel with a rubber mallet, alternating sides, to "walk" it off the shaft.

This is a common issue, especially with older machines or those used in damp environments. A small amount of rust between the steel shaft and the wheel’s arbor hole can act like glue. The key is to use gentle, persuasive force, not brute force.
Safely Removing a Stuck Wheel
Never use a steel hammer directly on a grinding wheel. Our wheels are hard, but they are also brittle. A sharp impact from a metal hammer will crack it, creating a serious safety hazard.
Instead, try these methods:
- Wiggle and Pull: Try to rock the wheel back and forth while pulling it towards you. Sometimes this is enough to break it free.
- Rubber Mallet: This is the best method. Give the back of the wheel a few firm but controlled taps on one side, then the other. This repeated, alternating force will slowly walk the wheel off the shaft without damaging it.
- Prying (With Caution): If it is really stuck, you can use two large, flat-head screwdrivers or small pry bars. Place them behind the wheel on opposite sides and pry gently and evenly. Be careful not to pry against the motor housing itself.
Once you get the wheel off, I recommend using a wire brush to clean any rust off the shaft and the inside faces of the flanges. This will make installing the new wheel, and removing it next time, much easier.
Conclusion
Always unplug your grinder first. Use the correct wrench for the nut, remembering the reverse thread on the right side of a bench grinder, and handle stuck wheels with care.
-
Explore various grinding wheels to choose the right one for your specific needs. ↩
-
Find out which wrench is most effective for safely removing a bench grinder wheel. ↩
-
Discover the significance of reverse threads in bench grinders for safety and functionality. ↩
-
Discover when and how to use locking pliers as a last resort for stubborn nuts. ↩
-
Learn the key differences to choose the right tool for your grinding tasks. ↩
Written by

leeon
You may also be interested in:

How do we carry out grinding for the crankshaft?
An engine is knocking and losing power. A worn crankshaft could be the problem, a high-stakes repair where a single mistake can ruin a valuable

Does a bench grinder need to be bolted down?
Your new bench grinder is heavy and feels stable sitting on the workbench. You figure its own weight is enough to hold it in place,

Can you use an angle grinder without a guard?
You are trying to cut in a tight corner, and the safety guard is getting in the way. Removing it for just one quick cut

What is the difference between “mincing” and “grinding”?
Your team uses "mincing" and "grinding" to describe similar tasks. This confusion in manufacturing terms can lead to ordering the wrong tools, which is a

Can you use a metal grinding wheel on wood?
Tempted to use a metal grinding wheel for a quick job on wood? It seems fast and easy, but this common shortcut can lead to

What are the different types of abrasive cutting tools?
Are you confused by the huge variety of abrasive tools available? Choosing the wrong tool for your material can lead to slow work, poor finishes,